
Have you ever dropped on a brand and wondered yourself: How could they create such professional photos like that? You want to mimic what they have done but your product photos still need to be more professional. If you are on a tight budget to hire a photographer, this blog is for you. We will reveal 10 secrets that can take your product photos to a new level.
From taking care of the background, color, light, and composition, for sure, you will have satisfying pictures in the end to post on your website, social media, and e-commerce platforms to attract more customers.
Let’s see what they are and how many tips you can apply to your next photoshoot instantly.
How to make product photos look professional?
Tell a story in your product photos
Product photos that tell a compelling story help connect with customers on a deeper level. Rather than shooting products isolated on white backgrounds, put them in context and evoke emotion through narrative elements.
For example, if shooting apparel, don’t just photograph the clothing itself. Show it being worn in a lifestyle scenario like someone bicycling through the city in your stylish new outfit. Use locations and models that represent your target demographic and their values. Convey the feeling the wearer has donning your fashionable and functional designs.
You can also showcase products by depicting before and after scenarios. If you sell cleaning solutions, shoot a stained surface being transformed into a sparkling clean one after applying your magic formula. Demonstrate the joy and satisfaction customers will feel using your effective products.

Similarly, if you sell workout equipment, illustrate someone progressing from out-of-shape to fit and strong thanks to your exercise system. Show the uplifting journey real people can undertake.
Finally, consider props and textures that hint at your brand story. If selling artisan crafts, photograph them against weathered wood and alongside flowers to conjure rustic freshness and highlight handmade quality.
With creativity and planning, you can produce product photos that resonate and linger in customers’ minds. Shift focus from showcasing items themselves to the experiences they enable.
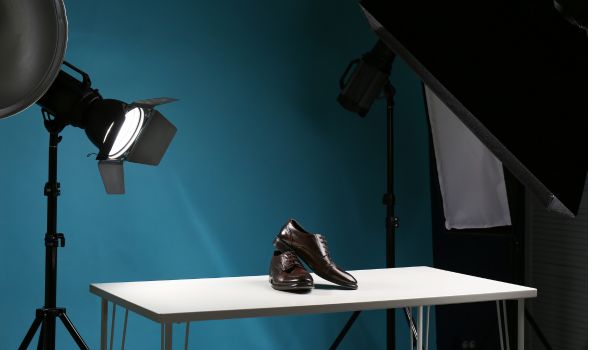
Your gear matters!
Having a good camera and a tripod is a must if you want to have professional products. Investing in quality photography equipment allows you to consistently capture crisp, professional shots.
Photographers prefer to use a DSLR camera with a high megapixel count and features like manual exposure control. Some popular brands to buy cameras from are Sony, Canon, Nikon, Olympus, and Fujifilm. Based on your budget and demand, ask the seller for a suitable camera. Remember to select lenses suited for close-up detail like macro lenses.

A sturdy tripod prevents blur from camera shake, while wireless remotes enable stability when pressing the shutter. For tabletop shots, small products, and liquids, use stacking, tilting, and clamping accessories to finesse angles. With practice and the right gear, you can achieve product photo mastery. Focus on delivering superb clarity, color, and composition shot after shot.
Use natural lighting for product photo
Harnessing natural light transforms product photos. It creates depth, dimension, and an inviting, organic feel that artificial light lacks.
You can position products near large windows where bright but diffused daylight enters. Note the direction of light and place items perpendicular to windows to avoid shadows.
Use white reflectors to bounce light into shaded areas. The golden hour like sunrise or sunset offers flattering golden hour light. Adjust camera settings to avoid overexposure. The soft, warm glow at Magic Hour flatters textures and contours.
Study light throughout the day and learn to leverage what windows and nature give you for professional, luminous product shots.
Choose the right product angles
Do you see that shooting everything straight is boring? One of the tips that make your competitors’s product photos more eye-catching is that their photographers know how to choose the right angle to reflect the product better. The most flattering, visually interesting angles take product photos to the next level.
Unfortunately, not everyone possesses the talent for seeing the best angles of an object. Therefore, to practice this tip, you will need to put in the effort, observe the object, and adjust your camera angles until you find a perfect angle. Here are several techniques to follow:
- Photograph from creative viewpoints to add drama.
- Shoot from below to lend power or high overhead for unique aerial-style shots.
- Use low diagonal angles to add depth and dynamic lines.
- For small items, move in close and fill the frame.
- Side and three-quarter views showcase product shape and texture.
- Shoot extra angles and perspectives.
Unique composition makes products stand out, keeps customers engaged, and underscores artistic vision. Leverage angles to impress the eye, evoke emotion, and highlight products’ best attributes.
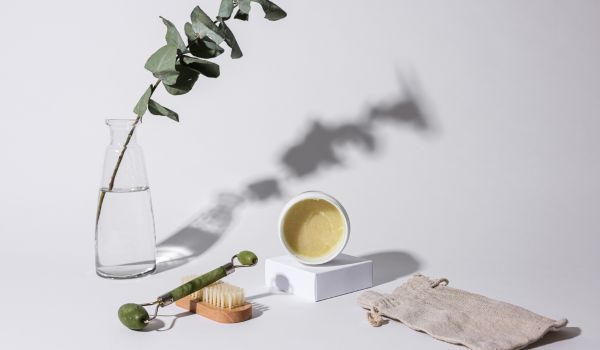
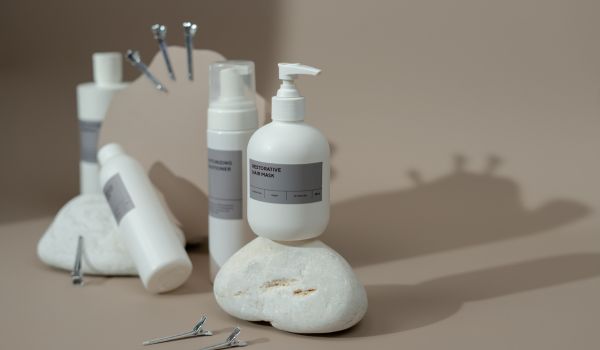
Style the setting
Curating the setting around products is crucial for conveying your brand story and making items shine. Professional product photos require backdrops, props, and textures that complement product colors and materials.

A neutral-colored wood board can accent natural fabrics and earthy ceramics beautifully. Showcasing sleek electronics against a black backdrop lends modern drama. For variety, photograph collections on different textured surfaces – weathered wood, marble, concrete, and linen. Keep prop colors muted so products pop. Style locations that represent your customers’ lifestyles. Tailor scenes to reinforce what makes your brand and items special through purposeful, artful settings.
Improve backgrounds
Here’s a tip for taking your product photos to the next level: pay attention to the background! A cluttered or distracting background competes with your product for attention. Instead, go for something simple.
You should use plain-colored paper, fabric, or a painted wall work nicely to make your product pop. Just watch out for wrinkles or shadows on the backdrop – properly lighting it is key.

For transparent objects, try suspending acrylic sheets behind to mimic a floating effect. Or use a nifty online tool like Remove-bg.ai to instantly swap out or erase backgrounds. A clean, consistent backdrop keeps the focus on your star – the product. Take the time to refine it, and your photos will look crisper and more professional.
Also read: How to create a white background for photos
Consider negative space
Allow breathing room in product photos by embracing negative space – areas of openness that balance a composition. Don’t overcrowd the frame or clutter the background. Strategically position products with empty space around them to create focal points and let details stand out. Clean, minimalist negative space helps products pop while lending a refined, professional look.
Master angles and lighting
It’s amazing how much a small adjustment to the angle or lighting can dramatically improve a photo. Play around with positioning the product higher, lower, or on an angle. Side and three-quarter views often work great to showcase shape and textures. For lighting, try bouncing a soft light onto the product to bring out details and colors. Reflectors are an easy and affordable way to lift shadows.
Get to know how light hits your product at different times of day. Sometimes a subtle change makes all the difference between an amateur shot and a professional hero image. Don’t be afraid to take many variations – slight shifts in perspective or brightness can really make products pop.
With practice, you’ll train your eye to spot nuances of angles and lighting that take product photos from flat to fabulous. Mastering these key elements gives you the skills to make products irresistible and let their best features shine.
Retouch product photos wisely
Post-processing lets you refine product photos, but use restraint. Overdone retouching looks artificial.
First, optimize images in Camera Raw for crisp details and ideal color/contrast. In Photoshop, subtly sharpen images and selectively adjust brightness, saturation, or hue on the product itself to make colors vibrant.
Carefully remove small imperfections with the Healing Brush. Avoid going overboard with filters. The key is to enhance the natural beauty of products, not transform them. For easy, powerful retouching, use AI tools like Adobe Photoshop Express for one-click optimizations done right.
Be creative and work efficiently
I know, easier said than done, right? But hear me out. You don’t need fancy equipment or days of prep to get pro-level product shots
Start by raiding your home for interesting backdrops and props. Grab some colored paper, cool textiles, kitchen tools – anything to set off your product. Craft stores are goldmines too! Building scenes around your product makes photos way more intriguing.
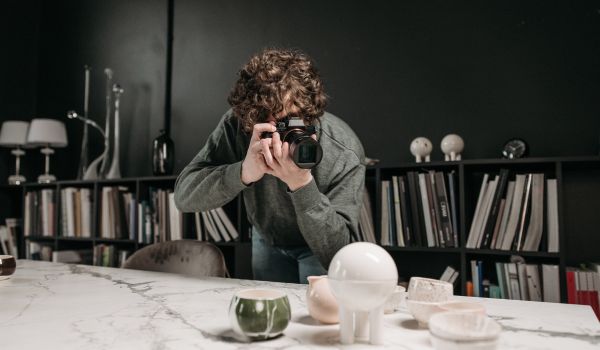
Plan ahead to create batches of images in thematic groups. Once you get your lighting dialed in, reuse and remix props in different ways. Have all your shots lined up like a smooth photo assembly line.
Also look for quick fixes that pack a punch, like using kitschy candy sprinkles to showcase jewelry. Small tweaks can make ordinary objects extraordinary!
Work your camera angles. Zoom in on the product’s best features. Shoot from below, above, the side – whatever makes it look irresistible.
With some creativity and efficiency, you can take product shots that impress. Make the most of your time and objects at hand rather than overthinking things. A little innovation goes a long way!
Final thought
You have learned 10 tips on how to make product photos look professional. With some planning and practice, you can create irresistible product photos. Follow these tips on lighting, angles, styling, and editing to make items pop. Now grab your camera, get creative with your products, and start snapping standout images that elevate your brand.